Flushing a water heater means draining the tank fully to remove the layer of mineral sediment that settles at the bottom over time. Sediment buildup reduces heating efficiency, causes popping or rumbling noises, and shortens the lifespan of the tank. This guide covers the exact tools needed, a full step-by-step draining process, and how often the task should be repeated based on water hardness.
Water Heater Flushing at a Glance
| Step | Task | Approx. Time |
|---|---|---|
| 1 | Turn off power or gas to the unit | 2 minutes |
| 2 | Shut off cold water supply | 1 minute |
| 3 | Connect a hose to the drain valve | 3 minutes |
| 4 | Open a hot water tap and the drain valve | Varies |
| 5 | Drain the tank completely | 15–30 minutes |
| 6 | Flush with cold water until clear | 10–15 minutes |
| 7 | Close valves and refill the tank | 10–15 minutes |
| 8 | Restore power or gas | 2 minutes |
Most tanks with moderate sediment take 45–60 minutes from start to finish. Tanks that haven’t been flushed in over two years often take longer because compacted sediment can clog the drain valve.
Why Sediment Builds Up in a Water Heater
Sediment forms when minerals naturally present in water — mainly calcium and magnesium — separate out as the water is heated and settle at the bottom of the tank. Homes on hard water supplies accumulate sediment faster because the water carries a higher mineral concentration to begin with. Gas water heaters are affected more visibly than electric models because the burner sits directly beneath the tank, and a thick sediment layer insulates the water from that heat source.
Left unaddressed, sediment buildup can:
- Reduce heating efficiency by insulating water from the heat source, forcing the unit to run longer to reach the same temperature
- Cause popping, cracking, or rumbling sounds as water boils underneath the trapped sediment layer
- Shorten tank lifespan by contributing to corrosion at the tank floor
- Reduce usable hot water capacity by physically displacing water volume at the bottom of the tank
- Clog the drain valve, making future maintenance harder the longer sediment is left in place
A tank with an inch or more of accumulated sediment can use 10–15% more energy to heat the same volume of water compared to a clean tank, according to general industry maintenance guidance from the U.S. Department of Energy.
Tools and Materials Needed
Gathering everything before starting prevents interruptions mid-drain, which matters most during the initial hot-water release when the tank is still pressurized.
- Garden hose (long enough to reach a floor drain, exterior door, or utility sink)
- Adjustable wrench or pliers
- Bucket (for any initial hose disconnection or backup drainage)
- Work gloves (the drained water can exceed 120°F)
- Flashlight (to inspect sediment clarity during flushing)
- Multimeter or non-contact voltage tester (electric units only, to confirm power is off)
Step-by-Step: How to Flush a Water Heater
Step 1: Turn Off the Power or Gas Supply
Gas units should have the thermostat set to “Pilot” or “Off” at the gas control valve. Electric units require the corresponding double-pole breaker switched off at the main panel, followed by a voltage test at the heating element access panel to confirm the circuit is dead. Skipping this step risks activating the heating element while the tank is empty, which can burn out the element within minutes.
Step 2: Shut Off the Cold Water Supply
The cold water inlet valve sits on top of the tank, typically on the pipe without a heat trap fitting nearby. Turning this valve clockwise stops new water from entering the tank during the flush. Leaving it open would let the tank continuously refill, extending the flush indefinitely and pulling sediment back into suspension.
Step 3: Let the Water Cool (If Recently Used)
Water sitting in the tank can reach 120–140°F immediately after heavy use. Waiting 20–30 minutes before starting the drain, or running a few gallons of hot water through a tap first, prevents scalding at the drain valve and hose connection point.
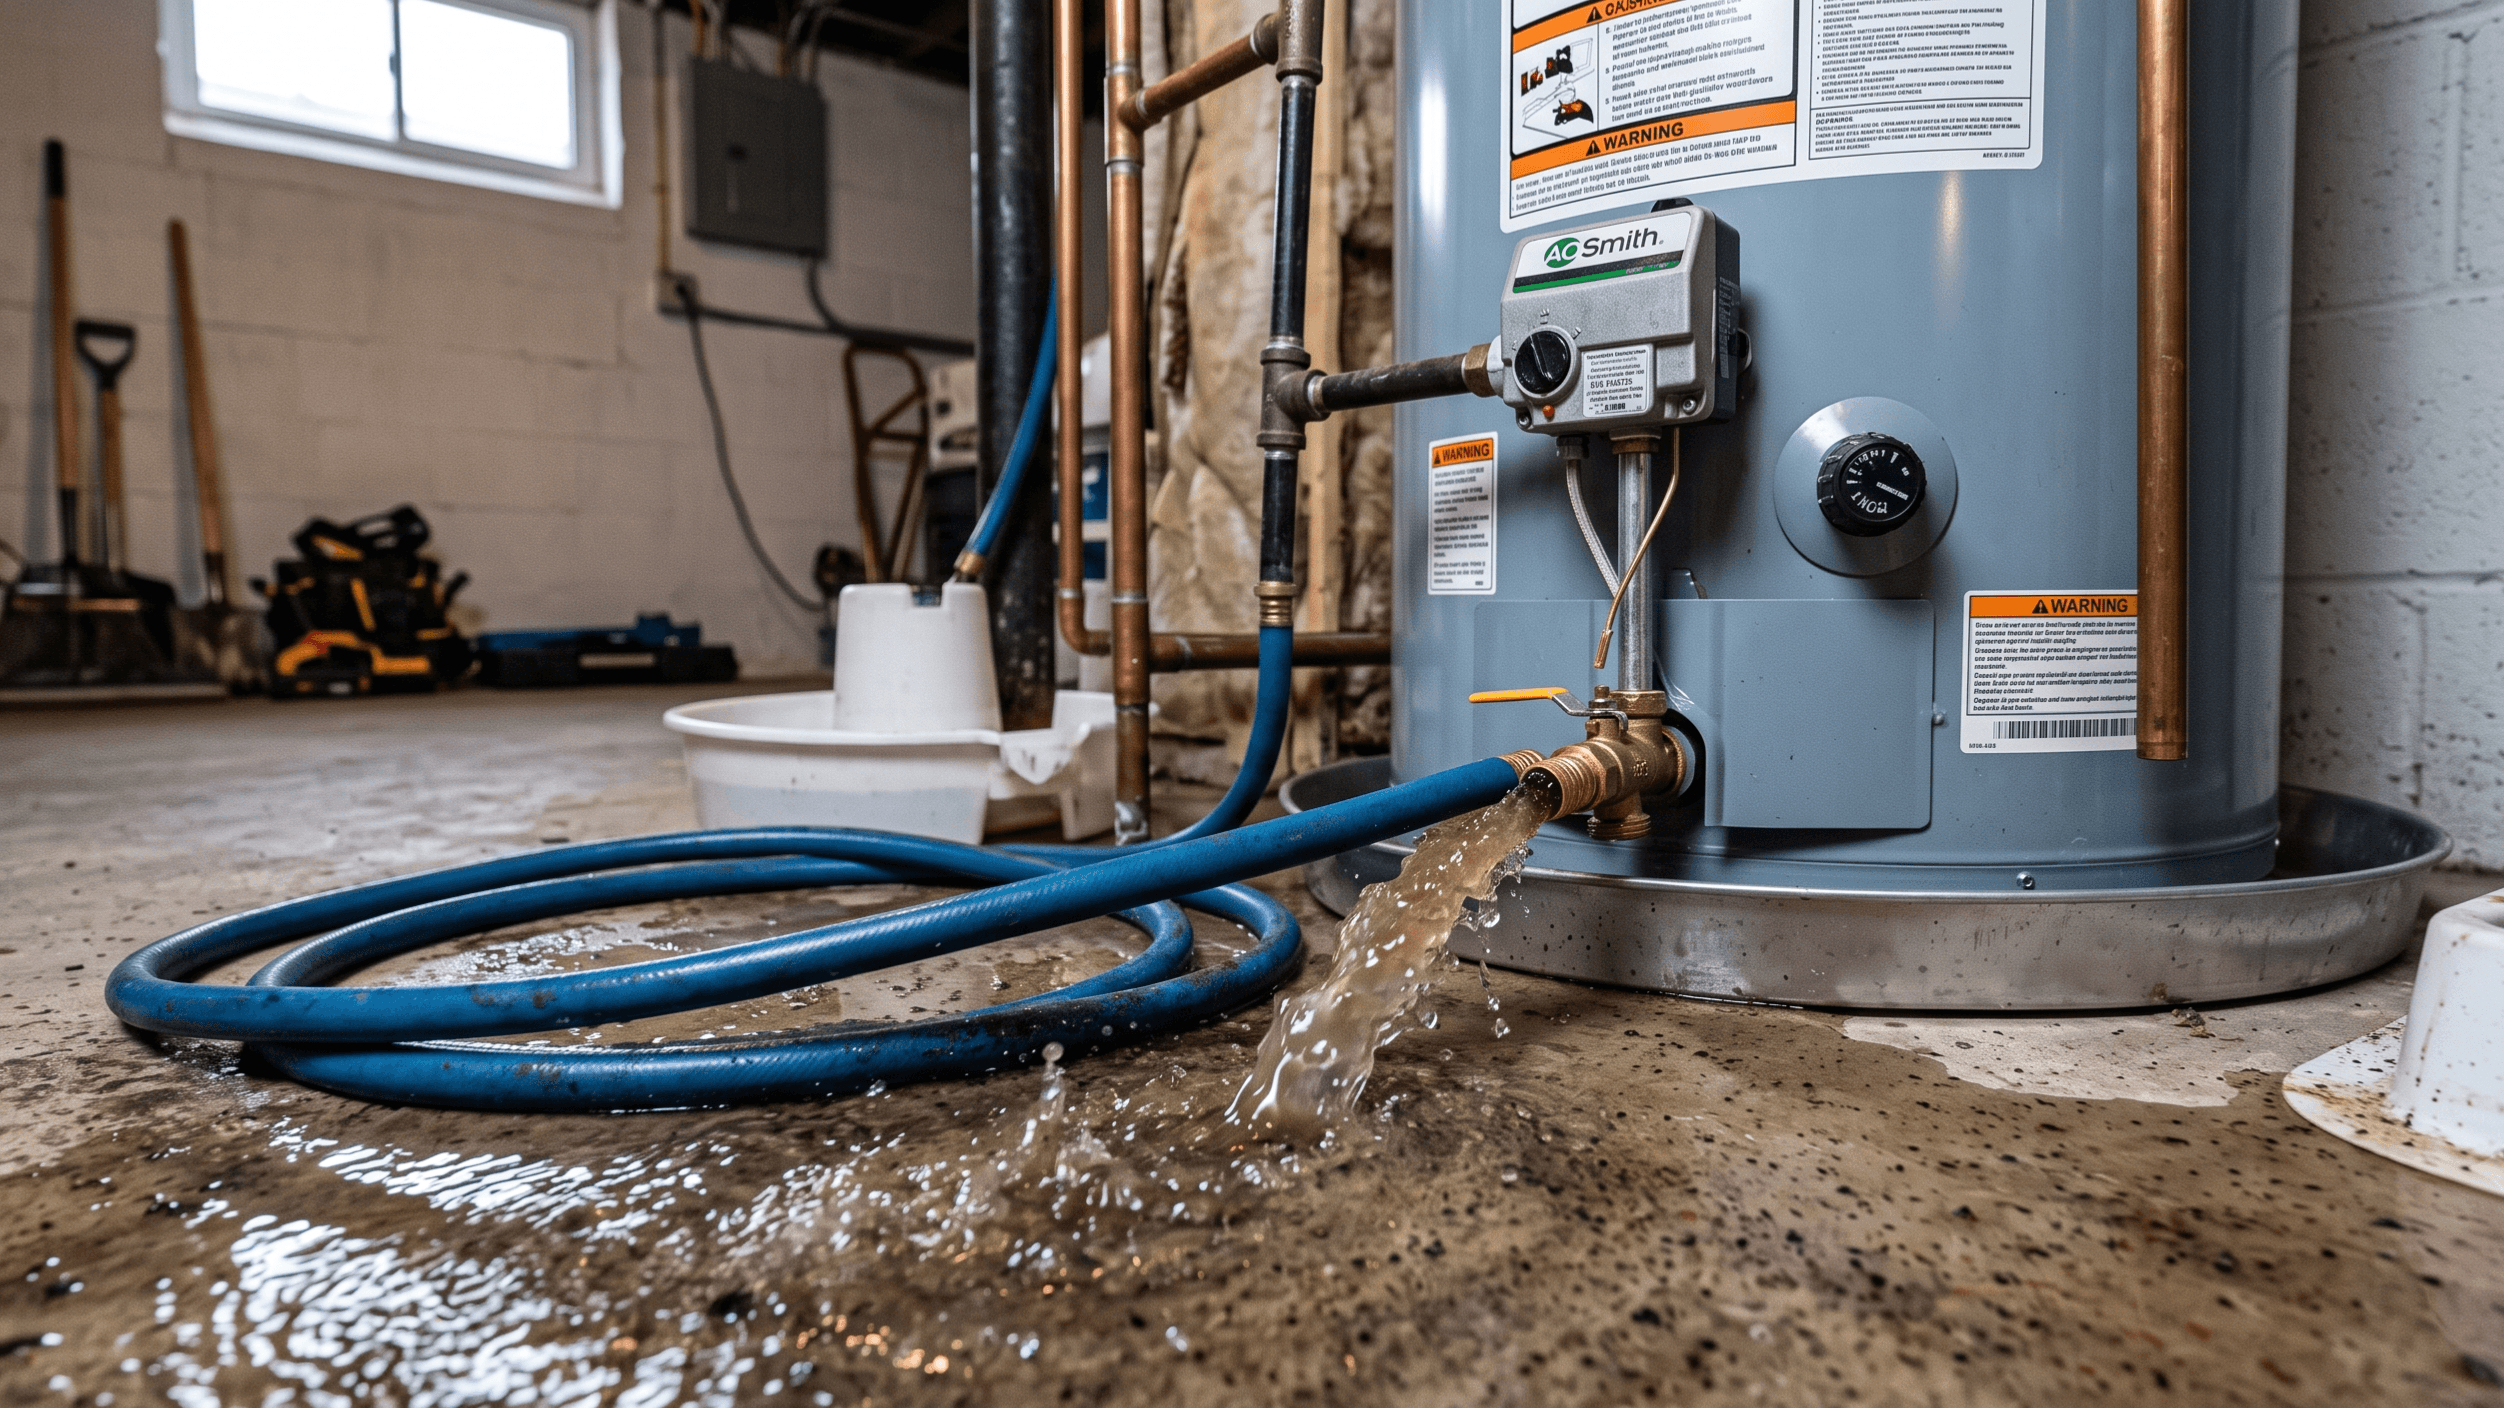
Step 4: Connect a Hose to the Drain Valve
The drain valve is located near the bottom of the tank and typically resembles a standard garden hose spigot. Threading a hose onto this valve and running the other end to a floor drain, exterior door, or large utility sink allows gravity to carry the drained water away without flooding the area. The hose should sit lower than the drain valve for the entire run to allow full gravity drainage.
Step 5: Open a Hot Water Tap Inside the House
Opening a hot water faucet somewhere in the house — a bathroom sink works well — breaks the vacuum seal inside the tank. Without this step, air cannot enter the tank to replace the draining water, and the flow through the drain valve slows to a trickle or stops entirely.
Step 6: Open the Drain Valve and Empty the Tank
With the hose secured and the indoor tap open, turning the drain valve counterclockwise starts the flow. A standard 40–50 gallon tank takes roughly 15–30 minutes to empty fully, depending on sediment thickness and drain valve condition. Older plastic drain valves clogged with sediment sometimes need a stiff wire or screwdriver inserted briefly to clear an initial blockage.
Step 7: Flush With Cold Water Until It Runs Clear
Once the tank is empty, briefly opening the cold water supply valve in short bursts while the drain valve stays open agitates any remaining sediment and flushes it out through the hose. This should be repeated — open the cold supply for 10–15 seconds, then close it — until the water exiting the hose runs clear with no visible grit or discoloration. Tanks with heavy buildup may need 5–10 rounds of this before the water clears completely.
Step 8: Close the Drain Valve and Refill the Tank
After the water runs clear, the drain valve closes first, followed by the hose disconnection. The cold water supply valve then reopens fully, and the tank begins refilling. The indoor hot water tap should stay open during this phase and only be closed once water flows from it steadily with no sputtering, which confirms all air has been purged from the tank and pipes.
Step 9: Restore Power or Gas
Electric units need a full tank of water covering the heating elements before power is restored; running an electric heating element without water surrounding it destroys the element almost immediately. Gas units can have their control valve switched back to “On” and the pilot relit according to the manufacturer’s instructions once the tank is confirmed full.
How Often to Flush a Water Heater
Flushing frequency depends primarily on local water hardness rather than tank age or brand.
- Hard water areas (over 7 grains per gallon): every 6 months
- Moderate water hardness (3–7 grains per gallon): once a year
- Soft water areas (under 3 grains per gallon): every 2 years
Homeowners unsure of their local water hardness can check a recent water quality report from their utility provider, which typically lists hardness in grains per gallon or parts per million. Homes on well water systems should flush on the more frequent end of this range, since well water often carries higher mineral and particulate content than municipally treated supplies.
Signs a Water Heater Needs Flushing
Several warning signs point to sediment buildup before it becomes a larger mechanical problem.
- Popping or rumbling noises during the heating cycle, caused by water boiling underneath a trapped sediment layer
- Longer wait times for hot water or a noticeable drop in how long hot water lasts
- Discolored or gritty hot water, especially noticeable right after the tap is first turned on
- Rising energy bills without a corresponding change in hot water usage habits
- A tank that hasn’t been flushed in over 12 months, regardless of visible symptoms
A faucet that sputters or spits air when first turned on can sometimes trace back to sediment disturbance in the water heater rather than an issue at the fixture itself, particularly if the sputtering coincides with a recent flush or hot water usage spike.
Troubleshooting Common Flushing Problems
Drain valve won’t open or is stuck. Plastic drain valves seize when sediment hardens around the threads. A short burst of penetrating oil, followed by gentle pressure with pliers, usually frees it. Forcing a severely stuck valve risks cracking it, which would require a full valve replacement before draining can continue.
No water is coming out despite an open valve. This almost always means sediment has clogged the valve opening from the inside. Briefly and carefully inserting a stiff wire through the valve opening can dislodge the blockage.
Water pressure seems low after refilling. Trapped air in the lines is the most common cause immediately after a flush. Running each hot water tap in the house for 1–2 minutes typically clears remaining air pockets. If low pressure persists beyond that, testing water pressure with a gauge can confirm whether the issue is isolated to hot water or affects the whole system.
Water never runs fully clear. Extremely heavy sediment accumulation, often in tanks that have gone 3+ years without flushing, sometimes cannot be fully cleared through the drain valve alone. In these cases, professional tank cleaning or evaluating whether the tank is nearing the end of its service life becomes the next consideration.
Frequently Asked Questions
Can I flush my water heater myself, or do I need a plumber?
Flushing a water heater is a task most homeowners can complete without professional help, provided the power or gas supply is properly shut off first and basic hand tools are available. A plumber becomes necessary mainly when the drain valve is severely stuck, corroded, or when the tank shows signs of significant sediment hardening that a standard flush cannot clear.
How long does it take to flush a water heater?
A full flush typically takes 45 minutes to an hour, including draining, cold water flushing, and refilling. Tanks that haven’t been flushed in more than two years can take longer due to clogged drain valves or heavily compacted sediment requiring multiple flush cycles.
Is it normal for the water to look dirty when flushing a water heater?
Yes, cloudy, rust-colored, or gritty water during the initial drain is expected and indicates sediment is being removed successfully. The water should progressively clear with each flush cycle; water that remains consistently dirty after 8–10 cycles may indicate the tank interior has significant corrosion rather than just loose sediment.
What happens if I never flush my water heater?
Untreated sediment buildup gradually reduces heating efficiency, increases energy costs, and can lead to premature tank failure from corrosion at the tank floor. In severe cases, thick sediment layers can cause overheating at the tank bottom, leading to cracking or leaks that require full tank replacement rather than routine maintenance.
Can flushing a water heater fix low hot water pressure?
Flushing can improve hot water pressure if the reduction was caused by sediment partially blocking the outlet pipe or displacing water volume inside the tank. If hot water pressure is low while cold water pressure remains normal, sediment buildup in the water heater is one of the more common causes worth ruling out before checking the fixture or supply line.
Should I flush an electric water heater differently than a gas one?
The core draining process is identical for both types, but the power-off step differs: gas units need the control valve set to pilot or off, while electric units require the breaker switched off and verified with a voltage tester. Electric units also carry a stricter risk during refilling, since restoring power before the tank is full can destroy the heating elements.
Meta Description:
Slug:
Excerpt: